Tuesday, January 30, 2018

SciFi 6mm Project 3: Smaller buildings

All of these are IO blocks. The two on the right have 3D Geo shapes on top. I cut a doorway into the one on the far left.

Finished. The windows are tiny 4mm flat-sided jewels. Lower left building has a barrel from my bits box cut in half on its roof.

Building on the left is made from 3D Geo pieces. The one on the right is made from 3D Geo cylinders/split balls glued to an IO piece center.

IO blocks. Like all of the pieces I added a bit of weathering to keep it from looking to brand new and sparkly.

My favorite building. MDF walls and roof. Wood strip corners. Bonus Points if you can figure out what the other two walls look like, keeping in mind who this project is for.

Future. Although I didn't use any of these mini IO blocks the Professor (who is 28mm scale) thinks they could be made into some cool equipment... or 2mm structures... or 28mm graveyard pieces. Hmmmmm...

That's the end of this project! Wonder what I'll make next... maybe a Corebrillic Infron Stabilizer (the newer THS Model, of course), a Nollan Persephonic Unit with Marieifiation Overwatch 5024, a customized Cryptic Holomodule, a tripolymer Rehtse Drive with Boxic options, a primary techtrical accelerator, a tall displacement resonator, a typical Randit endotronic abstraction, the newly developed oxial disonator, a clietic common bio-omniproxinator, a biroomniproxinator, a Darkon-Matrix Genoseden Metaphasic Protactor... so many fun choices!

Tuesday, January 23, 2018

SciFi 6mm Project 2: Construction and Large Buildings

Some ideas I got from the Internet. Some I came up with by fiddling around with the shapes. A bonus is most of the pieces can be used in larger scale games (= multi-purpose!).

Some selected examples...

These two towers are made from Pegasus kits. The left one is 150mm tall (!). Right only has brass rods with beads added on top.

Another Pegasus tower with brass rods, beads, Lego parts and a speaker from a greeting card that had audio.

 
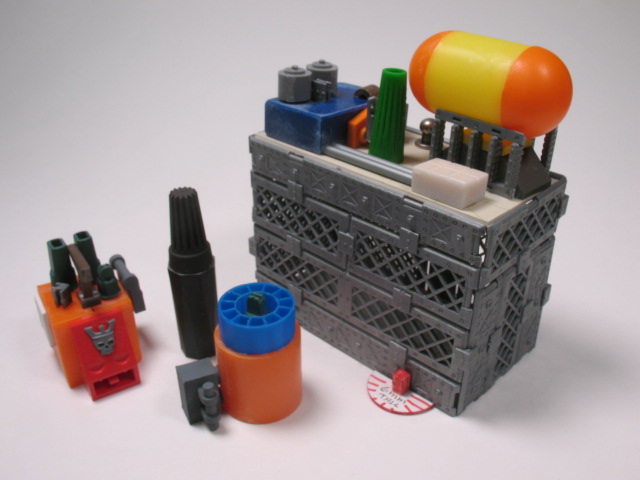
A stack of tape spools with a bottle cap, some piping and a Lego vent. The unit goes inside the Pegasus tower. The little red thing at the base of the tower gives me an idea of what a 6mm figure would look like next to it.

The stand on the right is also Pegasus parts. The radar base sitting on its top is from inside a dental floss container with Lego pieces attached (including the huge wheel). The assembly isn't glued to the stand so it can be swapped out as need be.

Next we have...
Unpainted equipment. Far left is a 3DGeo square with Lego and misc bits. Center is a Super Glue Gel cap glued on the cap of a Sharpie marker. Next to it is a 3D Geo cylinder with a slice of printer paper tape spool and Lego pieces glued on. Far right is another Pegasus parts base. On its roof is a 3D Geo rectangular block on the left with Lego and misc parts, a Super Glue Gel cap, a resin box in the corner, and 3D Geo cylinder with split ball ends for the raised tank.

Unpainted. Tape spool cut in half, ends glued on, then both glued to an IO Block. On the ends are more Lego pieces and a couple of small round beads, I later added a Lego Bionicle piece on top.

Finished pieces. Tank/base, radar, stack of tape spools, and raised platform in the center made from LaQ and Uberstix pieces. I picture some oh-so-important Bigshot Muckymuck standing on it, pontificating how important he and his ideas are while all the listeners wonder when his verbal rattling is going to finally be over so they can visit the snack bar and go home.

More equipment. Piece in front has a hair curler over two electric toothbrush bits (I think) and a slice of a printer paper roll. The unit goes inside the building, which is made from mattboard with Lego and other pieces glued on its removable roof.

NEXT: Other buildings.
 

Thursday, January 18, 2018

SciFi 6mm Project 1: Intro and Shapes

Good friend Thomas Foss http://skullandcrown.blogspot.com asked me to make some 6mm terrain for Adeptus Titanicus games. Here's what I came up with...

 
Towers, buildings, and equipment.

I used all kinds of shapes to build upon...

Pegasus hobby kits...
PLATFORMER, HEXAGON, CHEMICAL PLANT, POWER PLANT and SYBERCLICKS

From Oriental Trading...

IO BLOCKS. Each is 38mm.


3D GEOMETRIC SHAPES ("3D Geo"), all about 25mm. Hollow and it didn't take much to cut/pry them apart. The ball, for example, split into two equal halves.

MINI BLOCK PIECES, each 10mm

From eBay...

LaQ HAMACRON CONSTRUCTOR BLOCKS ("LaQ"). 17mm squares.

UBERSTIX. 115mm sticks and 15mm rings.

Also LEGOS (endless shapes and sizes. Great for detailing) and MISCELLANEOUS BITS from my bits boxes.

NEXT: CONSTRUCTION
 

Friday, August 4, 2017

10mm Castle


The finished castle. And yes, the background and foreground were edited in.
 
Here's a 10mm castle I put together for my good friend Thomas Foss (Skull and Crown). It comes from Supreme Littleness, is beautifully engineered and basically easy to assemble.
 
A FEW CONSTRUCTION NOTES...

 
PAINTING THE FINELY ETCHED STONEWORK. The colors I used were Americana NEUTRAL GREY, DecoArt STORM CLOUD GREY and FolkArt BARN WOOD. First, I glued a roundish 1" piece of foam on the end of a dowel. Next I put a blob of American NEUTRAL GREY paint on a flat piece of plastic, lightly dabbed the "brush" in the paint and blotted most of the paint off.


(1) Very lightly dabbed the paint on the stone surface.
(2) Using the brush I smeared the paint at a 45 degree angle trying to avoid clogging the etching lines as much as possible but you can see where it got in the lines in some places (near the red dots). Once the piece was painted I cleaned out the lines using a clean-up tool (a dowel with the pointy end of a small nail sticking out) before the paint dried. I also dabbed any edges that would be exposed as well. A fast and easy process although the pieces did need a second coat. But no problem. The paint dried so quickly that after all pieces in a group were done I immediately added the second coat to each. When dry I painted the edges and ends using a standard brush.
(3) The fully primed piece. The color is actually darker than shown, more like the one in (4).
(4) Small wall primed, ready for texture.
(5) Dabbed the brush in DecoArt STORM CLOUD GREY, removed most of the paint, very lightly dabbed the surface. No smearing.
(6) Dabbed on folkArt BARN WOOD. DONE! And much easier than drybrushing or hand painting each stone.
(7) Close-up of the finished texture.


 Two of the trays with painted and semi-assembled parts.
 
-ASSEMBLY. All of the pieces were easy to put together although the Main Gate was somewhat more involved. I took my time, carefully followed the instructions and test fit all the pieces before gluing. Here's the finished gate with two angle walls…
 
The gate slides up and the doors open.
 
 Thomas recommended a raised base so the castle would look a bit more "regal." I made one using a thin piece of wood glued onto Styrofoam. I added 1/8" thick blocks on top to make it easy to assemble the castle when setting up for a game and made a ramp from foamcore and card.
 
The tower walls are switchable for future layouts.
 
Along with a few extra walls and towers Thomas supplied a sally port and breached wall section.
 
BONUS! Thomas also asked me to put together a Townhouse and a Wizard's Tower (also from Supreme Littleness). As a little surprise I added glitter, a small sign, and a skull inside the tower's bottom floor.
 
That's it! Many thanks to Supreme Littleness for making such great kits and to Thomas for letting me assemble them.


Thursday, March 2, 2017

Medieval Ruins 2

These three pieces fit together...


This next piece has a removable top and shack...


 And treasure! The Mystical Shield of Thomar Nolper patiently waits to be found behind a small barrel.

Some scatter pieces I made for cover...


THAT'S IT! Time for YOU to make stuff!


Sunday, February 5, 2017

Medieval Ruins 1

Nothing spectacular here, just some ruins I made using my usual techniques (see METHODS>Chumley's 1 and 2).


This next pair fit together...
 
These two fit together as well...

Each of the buildings has a rolled scroll, a critter, and some piece of treasure, all waiting to be discovered by a brave explorer...
A scroll under the attic flooring and a giant red spider in the rafters.
 
Looks like Mr. Honks will soon find the Book of Obsequiousness in the rubble.
 
(more to come)


Tuesday, September 1, 2015

Small Guard House


I made two little buildings for my good friend Gary Price for Iron Mask Miniatures Dwarf Musketeers games at the Pacificon gaming convention in Northern California over the 2015 Labor Day weekend. Here's a photo he sent me for reference but said he would like them to be 60mm tall (without finial) with openings around 30mm wide by 40mm tall.


They were easy to make. Here are the end results:
 
The walls are chipboard (stiff thin card). Detail is dollhouse trim and balsa strips. Each side was made individually, then they were glued together with a reinforcing basswood strip added at each inside corner.
 
The roofs are also chipboard with copper wire super glued on. Finial is a round toothpick with a small wooden bead and a plastic craft bead. The side windows are slices of plastic tubing. The building was painted as well the roof, which was then glued to the building. That's all it took to make them!

 
These small structures have many uses…
I'm not sure if the sign refers to the owner's name or his wares. Probably both.
 
No, I don't need any knuckle sandwiches, thank you very not.

Lou has souvenir town maps available for tourists.

King Bob visits a guard house. Figures are from sets by Illumination Entertain-ment / Thinkways Toys.