Lastly, an array of jetties, dormers, and small attached sheds. They add a lot of character to an otherwise simple box. The dormer sides are corner scraps from building end pieces.
Tuesday, December 27, 2011
DETAILS 2: Doors. Woodpiles. Jetties. Dormers. Sheds
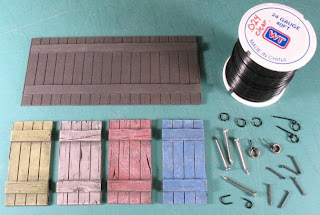
Doors were made from scribed basswood with balsa horizontals, undercoated black-brown, and cut into individual doors and painted as needed. I use black wire to make handles, as well as small nails, craft jump rings, and HO gauge railroad spikes.
More doors. The center example is mat board and shows nice fine wood detail, made by dragging an Xacto saw across its surface.
Firewood is first cut from a dowel (1/2” in this case) that’s been scribed with an Xacto saw blade for texture, painted dark brown, and dry brushed light gray. The cut pieces are then “chopped” using a utility knife and glued/stacked into piles. Cheap and easy to do!
Lastly, an array of jetties, dormers, and small attached sheds. They add a lot of character to an otherwise simple box. The dormer sides are corner scraps from building end pieces.
Lastly, an array of jetties, dormers, and small attached sheds. They add a lot of character to an otherwise simple box. The dormer sides are corner scraps from building end pieces.
Tuesday, December 20, 2011
DETAILS 1: Wheelbarrows, Hirst molds, Books
Here are some details to add in and around buildings.
Closed books are another easy mini-project. Cut strips from mat board, then paint both sides and one long edge (for the spine). Slice the books apart using a single-edged razor blade, slice some of those into smaller ones. Add cover and spine embellishments for variety.
Wheelbarrows are from scrap with a cut dowel wheel.
HIRST mold #85 and some castings made from it.
Check out the site ( hirstarts.com ) for mold #70 (“stone walls“, use them for chimneys) as well as the Gothic molds I have used for vampire mansions. And if you’re onto SciFi check out those molds.Closed books are another easy mini-project. Cut strips from mat board, then paint both sides and one long edge (for the spine). Slice the books apart using a single-edged razor blade, slice some of those into smaller ones. Add cover and spine embellishments for variety.
Tuesday, December 13, 2011
CHUMLEY'S 4: Finishing the project.
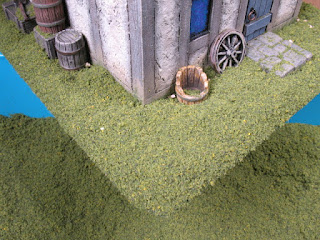
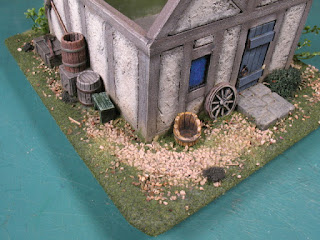
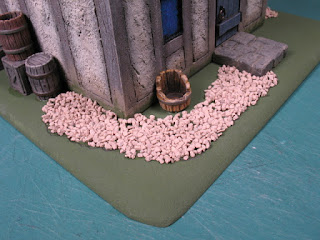
I painted a thick coat of white glue/PVA around the gravel, sprinkled a bit more gravel around the path, and dabbed some glue here and there within the gravel. Then I applied glue everywhere else on the base (including the edges!). Finally, I packed WOODLAND SCENICS MIXED TURF on and let it all dry. I apply the turf over the tub I keep it in to help contain excess residue.
The plastic plant holes were cleaned out and they were glued into place with super glue, as was the bench.
SNOWTIME AT CHUMLEY’S? Naaah, I just painted on a coat of matte medium to seal in the grass and gravel and sprinkled on some dead leaves (Whole Sweet Basil from the grocery store spice aisle) and light static grass. While still wet, I glued on the bush and some WOODLANDS SCENICS EXTRA COARSE TURF weeds, then let it all dry.
The snow has receded and all’s right with the world. All that layering takes patience (so much drying time!) but the result is quite pleasing. Hey! Is that Chumley’s pet salamander, Crikey, lurking about behind the ladder?
Rear view. Chumley and family have moved in and are beaming with pride. They’re inside baking pies for their guests. Guests love pie.
If you’ve been making your own version of Chumley’s, sign the bottom. Show your new masterpiece to friends and family. Relish how impressed they are by your creative awesomeness. Sign autographs! Become a star! Try to fit your inflated ego through your front doorway.
THE END. Class is over. I’m tired.
All dry and residue brushed off/reclaimed.
The plastic plant holes were cleaned out and they were glued into place with super glue, as was the bench.
SNOWTIME AT CHUMLEY’S? Naaah, I just painted on a coat of matte medium to seal in the grass and gravel and sprinkled on some dead leaves (Whole Sweet Basil from the grocery store spice aisle) and light static grass. While still wet, I glued on the bush and some WOODLANDS SCENICS EXTRA COARSE TURF weeds, then let it all dry.
Rear view. Chumley and family have moved in and are beaming with pride. They’re inside baking pies for their guests. Guests love pie.
If you’ve been making your own version of Chumley’s, sign the bottom. Show your new masterpiece to friends and family. Relish how impressed they are by your creative awesomeness. Sign autographs! Become a star! Try to fit your inflated ego through your front doorway.
THE END. Class is over. I’m tired.
BONUS!
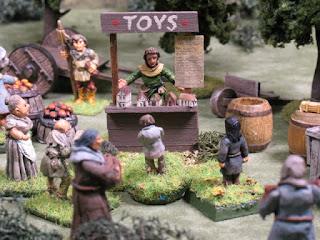
Chumley earns a few extra groats at a weekend roadside fair near Fossmoor.
NEXT: Other details
Tuesday, December 6, 2011
CHUMLEY'S 3: Roof and Base
You already know how the shingling was done (if not, refer to METHODS, HG WALLS). I very lightly stained black-brown around the chimney (too light to really see in the photo), and drybrushed it light gray.
Well, there you have it, all ready for the game table…
Oh, Chumley just reminded me he would like a small plot of land to put his building on. Read on!
The base is 6-1/4” by 7“ by 1/8” MDF with sanded round corners and beveled edges, painted green.
First, I set the building on the base and drew a line around it. Chumley chose some details from the bit box and I set them where I thought they’d look good. The bush is lichen, the plants and wheel are plastic. The small bench is from scraps, The door stoop, bucket crates, and barrel are all HIRST ARTS plaster castings. The tools are metal from a set I got years ago.
The rear and other side. The stump is plastic, I made the ladder, the bucket is HIRST, and the barrels are craft store items.
Removed everything from the base and drilled holes for the two plastic plants (which would have been a real pain to do if the building had been glued down already!) I also drew where some gravel would go.
(INSERT) I super-glued the shovel on top of the crate and, after drilling two holes in the side wall, I glued in two HO model railroad spikes, then the scythe. The spikes also make great door handles, by the way.
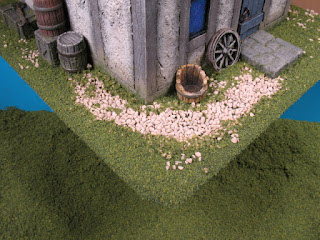
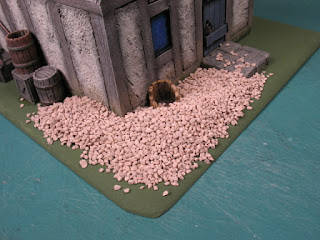
Everything but the plastic plants and bush were glued in place. A thick coat of white glue/PVA was painted on where the gravel was going and the gravel was packed on and left to dry…
Brushed off the excess gravel and reclaimed it. Here’s the end result. Looks OK but a bit too “precise” for my taste. I’ll fix the problem.
NEXT: THE FINALE!
Tuesday, November 29, 2011
CHUMLEY'S 2: Spackling, Painting, Windows/Doors, Floor
After a very light sanding, the outside of the shell is undercoated black-brown. Mrs. Chumley chose green for the interior. When dry, I put small pieces of tape where the windows/door will be so they don’t get covered up during the next stage.
Next, I filled in between the timbers using spackle (which you’re already familiar with since you’ve read METHODS, SPACKLING… right?). Let dry.
Time for color. Nothing clever here. Choose whatever colors work for you. Personally, I like muted, “earthy” tones. Here are the colors I used when painting Chumley’s:
BLACK-BROWN =Americana BITTERSWEET CHOCOLATE mixed with some black. The goal is an almost-black brown. It’s even darker than the photos indicate.
INTERIOR GREEN =Apple Barrel ENGLISH IVY GREEN.
SANDSTONE =Apple Barrel SANDSTONE.
DARK BROWN =Apple Barrel NUTMEG BROWN with black-brown added.
LIGHT GRAY =I use FolkArt BARNWOOD.
DOOR BLUE =FolkArt BLUE RIBBON over a black undercoat.
DIRT =Ceramcoat MUDSTONE.
BASE GRASS GREEN =DecoArt Crafter’s FOREST GREEN.
WHITE, BLACK =Whatever was handy.
LEFT: The spackled areas were first painted a sandstone color.
MIDDLE: The outer edges were then washed with a darker shade. When dry, the center areas were drybrushed sandstone/white (hard to see but it’s there!).
RIGHT: The timbers were done a dark brown.
Then the timbers were drybrushed light gray, being careful to emphasize the cracks and knotholes. Around the lower edge I scrubbed in some dirt and grass colors to help the building blend into the table top and look grounded.
Removed the blue tape and added outside window coloring cut from strips I made using the Windows Paint program. The door I had made previously from a sheet of scribed basswood with a couple of scrap timbering pieces across it. Hinges are just small folded pieces of black construction paper and the door handle is a small jump ring with thin wire wrapped around it.
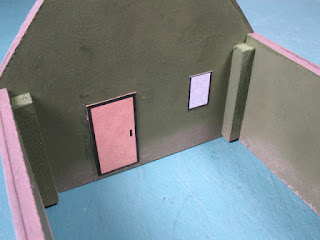
Inside, dirt color was scrubbed around the bottom edge. Interior windows and door are also made using Windows Paint and glued on using those pin holes for alignment. Note the door is 1/16” above the bottom edge.
The floor is simple. Cut a piece of mat board to fit the building bottom, then scribe planks into it using an awl/nail. Undercoated black-brown, dry brushed dark brown, light gray here and there for wear and tear, and dirt color around the perimeter. Then it was glued to the building at the four corners (secure it with small nails if you’re not making a base). I didn’t add any other interior detail like a fireplace or furniture so it would be open for figures and fingers.
NEXT: Roof, base.
Tuesday, November 22, 2011
CHUMLEY'S 1: The Building Shell
INTRO
It’s been a long journey but here we are at last. We actually get to use all that knowledge and MAKE something!. And if you haven’t read the TOOLS section and the METHODS sections on SPACKLING, CHIMNEY, and SHINGLING, do so now. I’ll wait. It will save you tons of time if you are already familiar with the processes and don’t have to refer to them as you go along. As a note, they were put into separate sections so I can refer to them during future projects.
Remember, this is just how Darrell Empey does it. (Your name here) may decide that all this dealing with MDF is too much of a pain. OK, just use Foamcore. And maybe just dab on the spackling between the timbers instead of toweling it on. Do what works for (your name here).
So here we go…
Lord Froglips has asked me to make a small cottage for his vassal, Chumley. Follow along as we construct this basic pseudo-Medieval building.
HERE’S THE BIG PAYOFF AT THE END...
I use standard tools, glues, craft paints, terrain supplies, and previously finished details from my bits box. There are a lot of steps but none of this is difficult, it just takes time.
Here are the building and roof pieces I cut on my scroll saw (see TOOLS). I use 1/8 inch Multi-density Fiberboard (MDF) for the shell, roof, and base.
The roof pieces are 5-¾” x 3-3/8”.
The ridge piece is cut from a 3/4” thick piece of shelving stock at an angle to match the front/back peak (photo below). To me, a 45 degree peak angle doesn’t look right. It is 4-7/8 inches long.
The interior supports are ¼ inch square stock, 1-15/16 inches long (for 1/16” floor clearance).
The building end pieces are 4 inches wide with 2 inch sides and 4-1/2” to the peak.
The base (not shown) is optional and discussed later.
The shell gets glued together with wood glue. Note how the ends align with the sides and that clearance is left for a 1/16 inch thick floor I’ll be making.
Next, the timbering is glued on. I use 1/16 inch sheet balsa cut into 3/16 inch strips cut to length (see TOOLS). When dry, the upper timbers on the sides are sanded to match the roof angle.
For interest, timber cracks and knotholes were made with an awl/nail, then tiny pin holes are drilled near the top corners of the windows/door areas for alignment of the inside windows and door later.
It’s been a long journey but here we are at last. We actually get to use all that knowledge and MAKE something!. And if you haven’t read the TOOLS section and the METHODS sections on SPACKLING, CHIMNEY, and SHINGLING, do so now. I’ll wait. It will save you tons of time if you are already familiar with the processes and don’t have to refer to them as you go along. As a note, they were put into separate sections so I can refer to them during future projects.
Remember, this is just how Darrell Empey does it. (Your name here) may decide that all this dealing with MDF is too much of a pain. OK, just use Foamcore. And maybe just dab on the spackling between the timbers instead of toweling it on. Do what works for (your name here).
So here we go…
Lord Froglips has asked me to make a small cottage for his vassal, Chumley. Follow along as we construct this basic pseudo-Medieval building.
HERE’S THE BIG PAYOFF AT THE END...
I use standard tools, glues, craft paints, terrain supplies, and previously finished details from my bits box. There are a lot of steps but none of this is difficult, it just takes time.
Here are the building and roof pieces I cut on my scroll saw (see TOOLS). I use 1/8 inch Multi-density Fiberboard (MDF) for the shell, roof, and base.
The roof pieces are 5-¾” x 3-3/8”.
The ridge piece is cut from a 3/4” thick piece of shelving stock at an angle to match the front/back peak (photo below). To me, a 45 degree peak angle doesn’t look right. It is 4-7/8 inches long.
The interior supports are ¼ inch square stock, 1-15/16 inches long (for 1/16” floor clearance).
The building end pieces are 4 inches wide with 2 inch sides and 4-1/2” to the peak.
The base (not shown) is optional and discussed later.
The odd roof peak angle.
The shell gets glued together with wood glue. Note how the ends align with the sides and that clearance is left for a 1/16 inch thick floor I’ll be making.
Next, the timbering is glued on. I use 1/16 inch sheet balsa cut into 3/16 inch strips cut to length (see TOOLS). When dry, the upper timbers on the sides are sanded to match the roof angle.
For interest, timber cracks and knotholes were made with an awl/nail, then tiny pin holes are drilled near the top corners of the windows/door areas for alignment of the inside windows and door later.
NEXT: Filling between the timbers, painting, windows, doors, floor.
Tuesday, November 15, 2011
HG WALLS SHINGLES 3: Gluing, Individual shingles
The basic unshingled roof, painted and with its chimney. Photo is obviously out of focus (like me most of the time). The horizontal lines are random and help my old eyes keep the strips lined up.
Let’s glue on the strips. Take a pack apart, discarding its staple and pull tab. Cut each strip to approximate length but save the scraps!
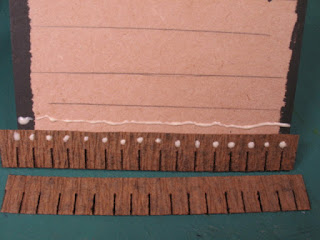
Remember those 1/4” strips you cut earlier? Glue one to the bottom edge of your roof and trim it to length. Using a strip as a guide, run a glue line about 1/4” from its top edge and put little dots of glue where the first strip goes and glue it down. Note the dots go in the center of each shingle for this row only. The strip should overhang the bottom edge by 1/8“.
Using the same idea, glue the next strip on the upper part of the previous, but the dots are at the top of previous row’s slots…
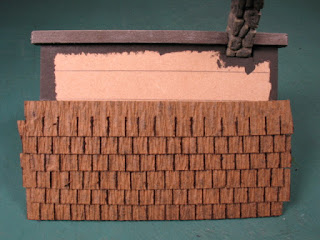
The strip just covers the top of the slots, and is offset from the one below it (exposed shingles are about 1/4“ by 1/4“). Continue up the roof to the top. Here we’re over halfway done.
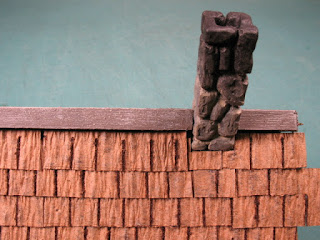
The topmost shingles are trimmed to fit. Don’t forget the area around the chimney!
Another 1/4“ strip was used to “finish” the edge. Trim the shingle ends so there’s a slight overhang and TA DAA! ALL DONE! When you’re done crunching down another cookie do the other side.
QUIZTIME! Take another look at the completed roof at the beginning of all this (HG SHINGLES 1). Did you notice that scraps were used on the 7th and 8th rows from the bottom? I didn’t think so. Me neither.
There you have it! Go shingle some roofs!
BONUS! INDIVIDUAL SHINGLES
If you’re planning on making just a single building or two with a shingled roof and don’t want to go to all of the trouble of making a jig and cutting strips, here’s how I do it:
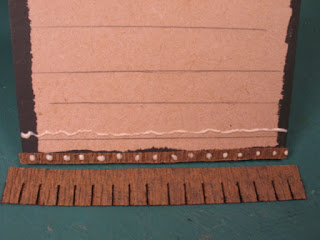
I use the Tree Wrap material but for this demo photo I‘m using thin card for clarity. First, draw horizontal lines 5/16” tall. Then cut vertical slits 1/4“ apart with an Xacto knife, but NOT quite all the way to the top. Lastly, pick the whole thing up and, starting from the bottom, use scissors to cut the shingles apart. VOILA! A pile of shingles. Undercoat your roof dark brown and glue the shingles to it, overlapping each row so the exposed shingles are around 1/4” square.
Let’s glue on the strips. Take a pack apart, discarding its staple and pull tab. Cut each strip to approximate length but save the scraps!
Remember those 1/4” strips you cut earlier? Glue one to the bottom edge of your roof and trim it to length. Using a strip as a guide, run a glue line about 1/4” from its top edge and put little dots of glue where the first strip goes and glue it down. Note the dots go in the center of each shingle for this row only. The strip should overhang the bottom edge by 1/8“.
The topmost shingles are trimmed to fit. Don’t forget the area around the chimney!
Another 1/4“ strip was used to “finish” the edge. Trim the shingle ends so there’s a slight overhang and TA DAA! ALL DONE! When you’re done crunching down another cookie do the other side.
QUIZTIME! Take another look at the completed roof at the beginning of all this (HG SHINGLES 1). Did you notice that scraps were used on the 7th and 8th rows from the bottom? I didn’t think so. Me neither.
There you have it! Go shingle some roofs!
BONUS! INDIVIDUAL SHINGLES
If you’re planning on making just a single building or two with a shingled roof and don’t want to go to all of the trouble of making a jig and cutting strips, here’s how I do it:
I use the Tree Wrap material but for this demo photo I‘m using thin card for clarity. First, draw horizontal lines 5/16” tall. Then cut vertical slits 1/4“ apart with an Xacto knife, but NOT quite all the way to the top. Lastly, pick the whole thing up and, starting from the bottom, use scissors to cut the shingles apart. VOILA! A pile of shingles. Undercoat your roof dark brown and glue the shingles to it, overlapping each row so the exposed shingles are around 1/4” square.
NEXT: AT LONG LAST! CHUMLEY’S!!!
Tuesday, November 8, 2011
HG WALLS SHINGLES 2: Slots
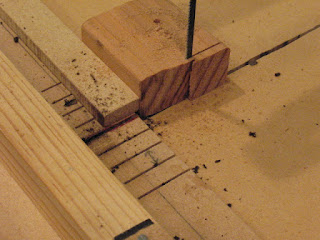
The jig for cutting slots in the shingle packs on my band saw. The separate piece at the top holds the pack down and reminds me not to cut off a finger. The piece at the bottom gets temporarily attached to the underside of my sliding table, acting as a stop so the slots will be a uniform 5/16“ deep.
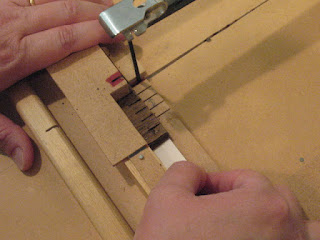
Time to cut the slots. I use a fine tooth blade when cutting shingles. The photo shows the jig clipped onto the sliding table I made for my scroll saw (see TOOLS). The first cut is about to be made, just needs that hold down piece. The staple is the right of where the cut will be. The process is simple….
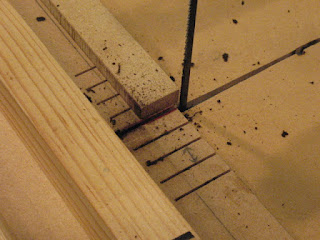
Cut and pull, cut and pull: Hold the strip pack down with pressure, cut a 5/16 inch deep slot, release the hold down, slide the pack to the right 1/4“ using its tab, check alignment, and repeat. This is one of those things that goes quickly and is easier to do than to explain.
After all the slots in a pack have been cut, there’s a lot of tar residue. Look closely and you’ll see the blade is gucked up as well…
I clean the blade by cutting through a scrap piece of hardwood, clean the cutting slot with an old Xacto knife blade, then dust the area off.
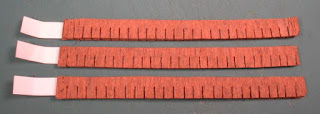
Give yourself a cookie, then make more packs. As it worked out, the sample roof is small (only 2-1/4” by 4-3/8”) and needed just 15 strips for the entire roof (only 1-1/2 packs). So now I’ve got extra packs. Oh, well, I ‘spose I’ll just have to make another roof for another building!
Time to cut the slots. I use a fine tooth blade when cutting shingles. The photo shows the jig clipped onto the sliding table I made for my scroll saw (see TOOLS). The first cut is about to be made, just needs that hold down piece. The staple is the right of where the cut will be. The process is simple….
After all the slots in a pack have been cut, there’s a lot of tar residue. Look closely and you’ll see the blade is gucked up as well…
I clean the blade by cutting through a scrap piece of hardwood, clean the cutting slot with an old Xacto knife blade, then dust the area off.
NEXT: Gluing ‘em on the roof and making individual shingles.
Tuesday, November 1, 2011
HG WALLS SHINGLES 1: Packs
WHAT IT’S ALL ABOUT: If you plan on shingling any quantity of roofs at all, you definitely should use this technique developed by Legendary Master Herb Gundt of HG WALLS fame. He shared it with me many years ago (as well as having it published in Wargames Illustrated) and it’s saved me countless hours of effort. It’s MUCH easier to glue on strips of shingles than to glue each one on individually…..one… at… a… time (=zzzzzzzzzz).
The first thing you need is the right material: Tree Wrap! Mine is made by Drainage Industries, 300 N. Lilas Ave, Appleton, Wisconsin 04514. Check the Internet for where to buy it. Basically it is a thin layer of tar trapped between two layers of thick brown crinkled paper (=no painting necessary!). This roll is 4 in. wide and 150 FEET long. That’s a LOT of shingles, my friend!
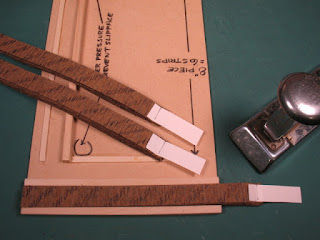
Cut 8” strips using a paper cutter, then mark the back of each with a marker since the front side and back side are a slightly different shade.
Next, make a simple jig and cut each piece into 5/8” strips. Each piece yields 6 strips. While you’re at it cut some thin strips that are around 1/4“. You’ll need them later.
Stack 10 strips together into a neat pack and staple a thin card “pull tab” to the back of one end. So far so good.
NEXT: Cutting slots in the packs.
Subscribe to:
Posts (Atom)
