
The finished castle. And yes, the background and foreground were edited in.
Here's a 10mm castle I put together for my good friend Thomas Foss (Skull and Crown). It comes from Supreme Littleness, is beautifully engineered and basically easy to assemble.
A FEW CONSTRUCTION NOTES...


PAINTING THE FINELY ETCHED STONEWORK. The colors I used were Americana NEUTRAL GREY, DecoArt STORM CLOUD GREY and FolkArt BARN WOOD. First, I glued a roundish 1" piece of foam on the end of a dowel. Next I put a blob of American NEUTRAL GREY paint on a flat piece of plastic, lightly dabbed the "brush" in the paint and blotted most of the paint off.
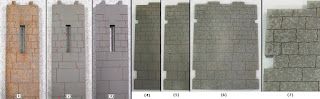
(1) Very lightly dabbed the paint on the stone surface.
(2) Using the brush I smeared the paint at a 45 degree angle trying to avoid clogging the etching lines as much as possible but you can see where it got in the lines in some places (near the red dots). Once the piece was painted I cleaned out the lines using a clean-up tool (a dowel with the pointy end of a small nail sticking out) before the paint dried. I also dabbed any edges that would be exposed as well. A fast and easy process although the pieces did need a second coat. But no problem. The paint dried so quickly that after all pieces in a group were done I immediately added the second coat to each. When dry I painted the edges and ends using a standard brush.
(3) The fully primed piece. The color is actually darker than shown, more like the one in (4).
(4) Small wall primed, ready for texture.
(5) Dabbed the brush in DecoArt STORM CLOUD GREY, removed most of the paint, very lightly dabbed the surface. No smearing.
(6) Dabbed on folkArt BARN WOOD. DONE! And much easier than drybrushing or hand painting each stone.
(7) Close-up of the finished texture.

Two of the trays with painted and semi-assembled parts.
-ASSEMBLY. All of the pieces were easy to put together although the Main Gate was somewhat more involved. I took my time, carefully followed the instructions and test fit all the pieces before gluing. Here's the finished gate with two angle walls…

The gate slides up and the doors open.


(1) Very lightly dabbed the paint on the stone surface.
(2) Using the brush I smeared the paint at a 45 degree angle trying to avoid clogging the etching lines as much as possible but you can see where it got in the lines in some places (near the red dots). Once the piece was painted I cleaned out the lines using a clean-up tool (a dowel with the pointy end of a small nail sticking out) before the paint dried. I also dabbed any edges that would be exposed as well. A fast and easy process although the pieces did need a second coat. But no problem. The paint dried so quickly that after all pieces in a group were done I immediately added the second coat to each. When dry I painted the edges and ends using a standard brush.
(3) The fully primed piece. The color is actually darker than shown, more like the one in (4).
(4) Small wall primed, ready for texture.
(5) Dabbed the brush in DecoArt STORM CLOUD GREY, removed most of the paint, very lightly dabbed the surface. No smearing.
(6) Dabbed on folkArt BARN WOOD. DONE! And much easier than drybrushing or hand painting each stone.
(7) Close-up of the finished texture.


Thomas recommended a raised base so the castle would look a bit more "regal." I made one using a thin piece of wood glued onto Styrofoam. I added 1/8" thick blocks on top to make it easy to assemble the castle when setting up for a game and made a ramp from foamcore and card.

The tower walls are switchable for future layouts.

Along with a few extra walls and towers Thomas supplied a sally port and breached wall section.

BONUS! Thomas also asked me to put together a Townhouse and a Wizard's Tower (also from Supreme Littleness). As a little surprise I added glitter, a small sign, and a skull inside the tower's bottom floor.
That's it! Many thanks to Supreme Littleness for making such great kits and to Thomas for letting me assemble them.